

3D Printer for Kids and Beginners,Geeetech Mini 3D Printers with Auto Leveling,High Speed and Fully Open Source,Fully Assembled Direct Drive Extruder,for Home and School,Print Area 3.94×4.33×3.94 in
Original price was: $299.99.$199.00Current price is: $199.00.


Product description


1 Direct Drive Extruder
2 User-Friendly Designs
3 For Beginners Design


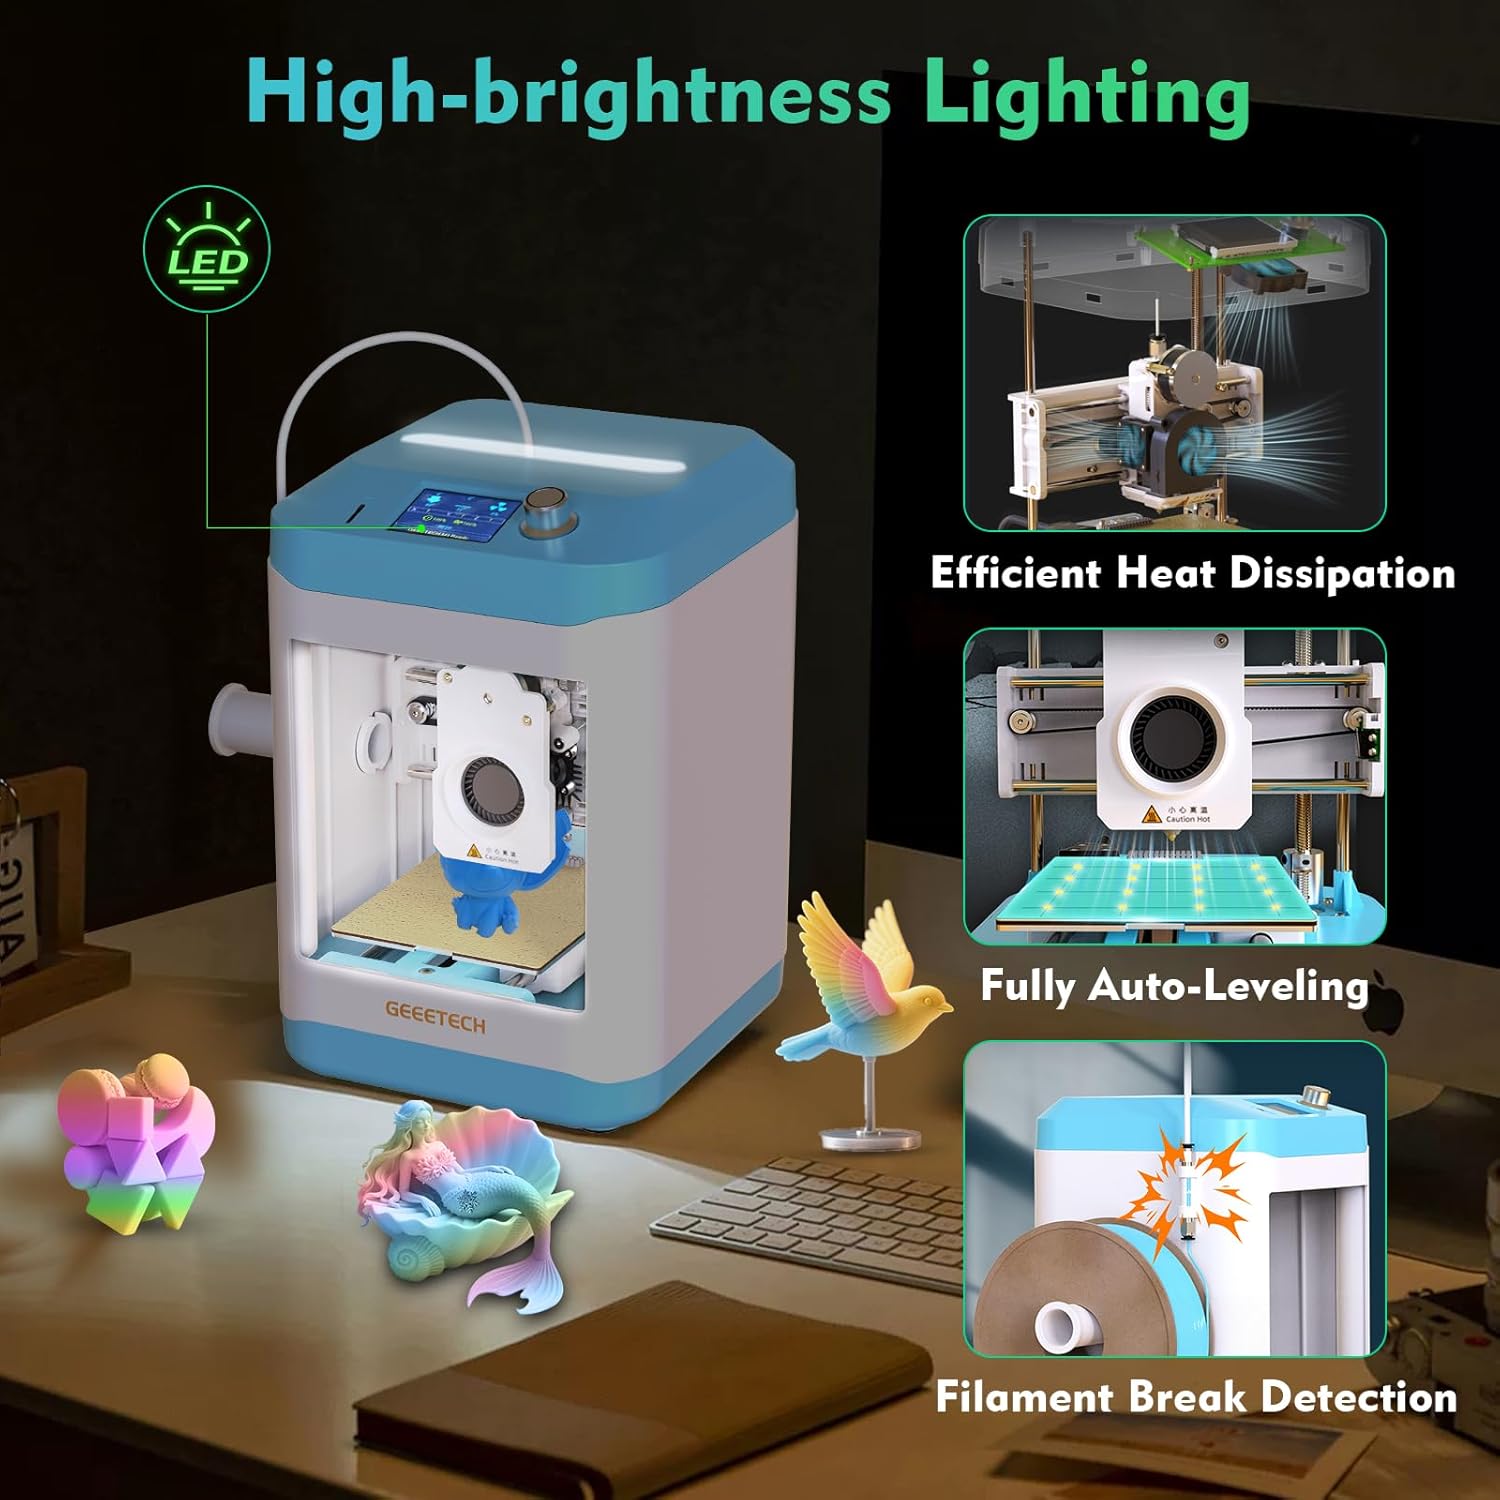
High-Speed & Premium Quality Print:Geeetech 3D pinters has large-capacity nozzle,a 50W hot-end heating rod,and efficient heat dissipation,improve pinting stability and reliability further.Insert TF Card,plug-n–play,with a printing speed of up to 250mm/,save printing time,our printer turns complexity into creativity-fueling simplicity,greatly reducing the threshold for beginners
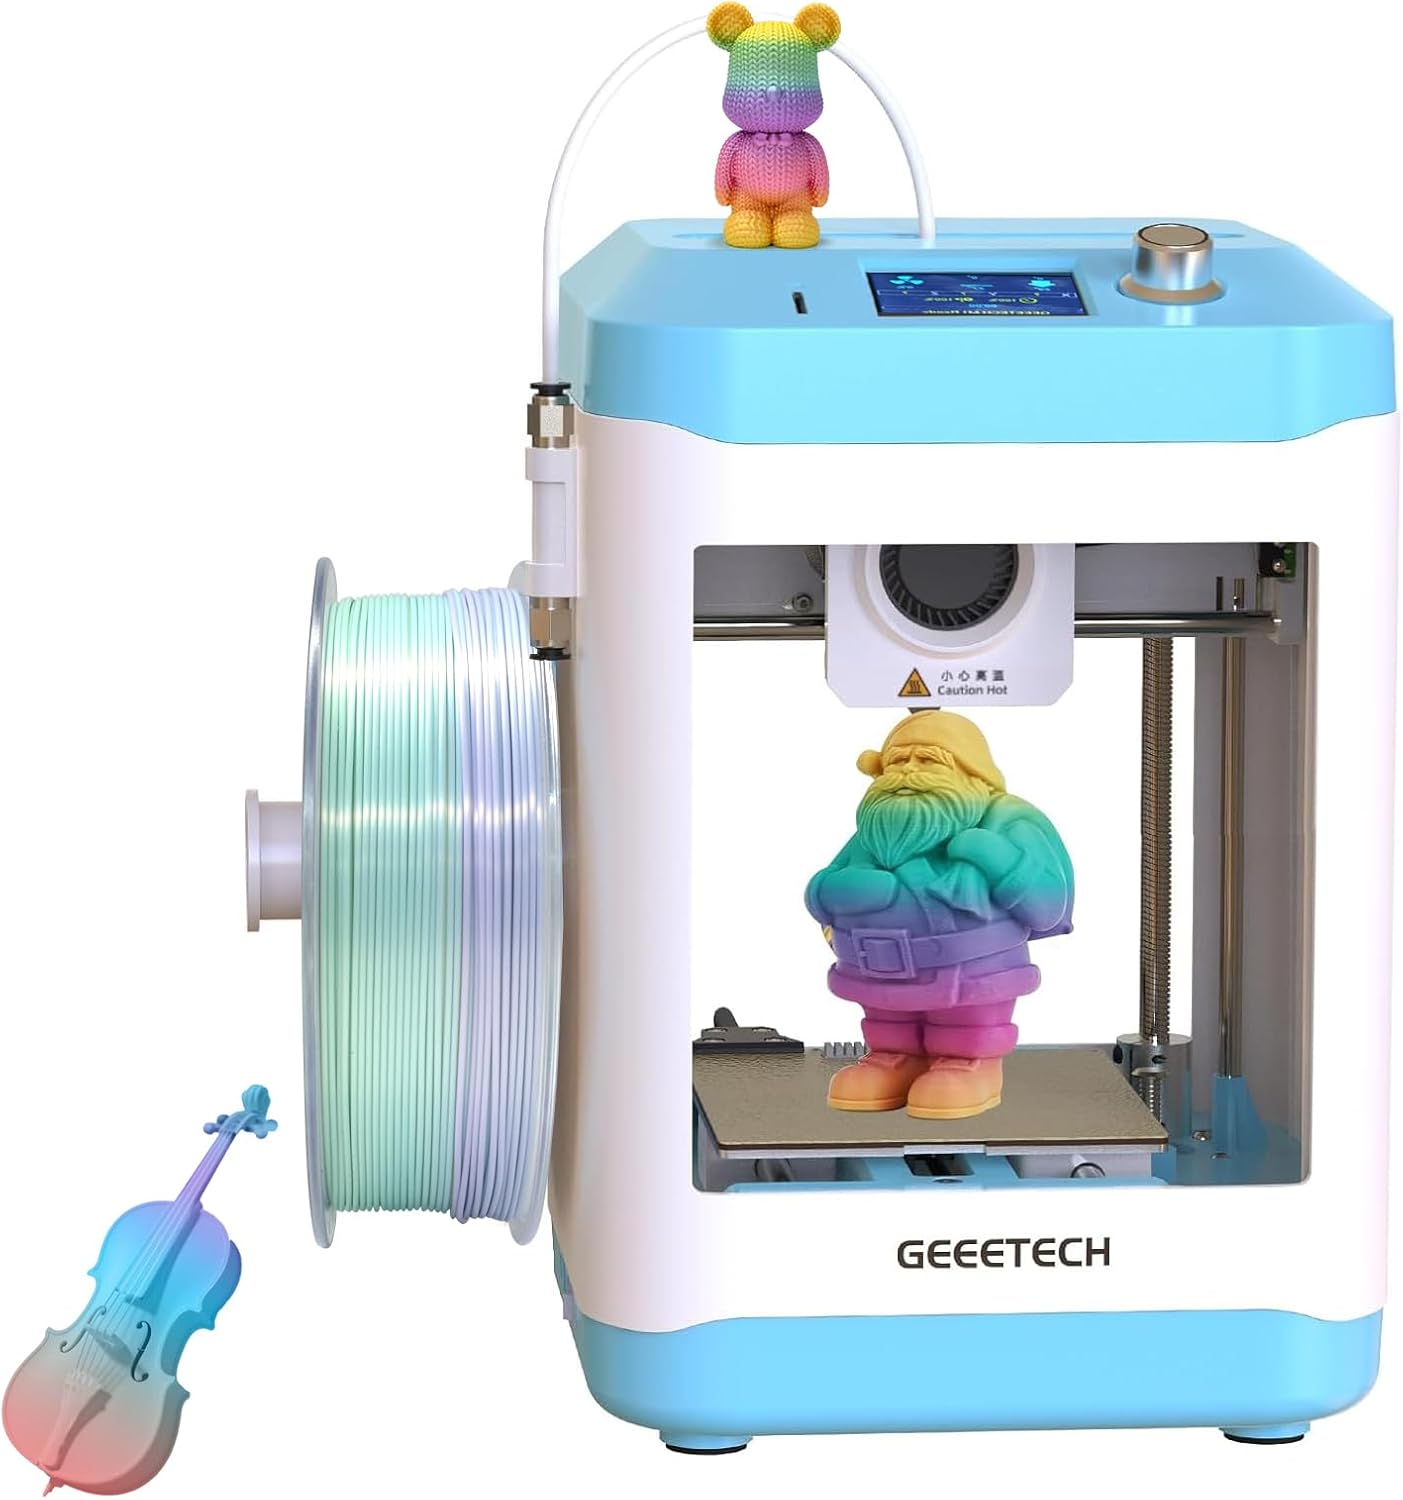
Direct Drive Extruder:M1 mini 3D printer uses a dual-drive metal gear with a gear ratio of up to 1:5,greater torque, greater extrusion force,higher printing accuracy, and can easily print 0.5kg TPU/PLA consumables.Print area 3.94×4.33×3.94 in.Note: No worries if you need use 1kg filaments,filament holder profile we have provided it on the details page.
Auto-Leveling & Heated Platform: This small 3d printer has a 16-Point full-auto leveling technology which makes printing more simple and more precise ,ensure a smooth printing process every time.With flexible and removable magnetic build plate, reduce model warpage issues,you can remove the models easily and easy cleaning of the platform
Perfect for Kids and Beginners:Out of the box,fully assembled 3d printers is super easy to operate and does not require a complex setup,knob operation, one button in/out filament,even those with no prior experience can quickly master it,experience the convenience and reliability of this 3D printer.With 2.4″ LCD color screen,high-brightness lighting,and PEI print plate.A good idea as a surprise gift on a birthday or holiday, for school teaching, or a shop crafts and toys DIY, etc.
Friendly Warranty:We offer 30 days of worry-free return/replacement for this 3d printer, 12-month free repair and lifetime professional technical support. If you have any questions, please contact us,we will reply within 24 hours


GorillaBob –
A Great Introduction to the Entire 3D Printing Process!
A little background to start. I have been 3D printing for 20+ years. do I know everything about 3D printers, No, but I have plenty of experience. I have another Geeetech printer, as one of 7 current printers. I am also a technology teacher with experience with many different printers. With that stated, is this a take it out of the box and it does everything for you type of printer? No, it is the type of printer that you use as a teaching tool. It is not for someone that wants little trinkets to just “AutoMagically” appear out of thin air. This printer will allow someone to learn about 3D printing, providing a good background experience to allow them to understand the process and troubleshoot when an STL has problems. It is simple, easy, inexpensive. In fact, as several users have complained about, the little printer, “as designed” does not hold a standard roll of PLA. However Geeetech has an STL file on their website, that is designed to be printed on this machine, that will allow the use of the full sized spools. That is what learning to 3D print is all about! Find a problem that 3D printing can solve, print that design! Will a young person need some help with this printer? Probably, but Youtube is an amazing teaching tool and the number of videos concerning this printer is steadily growing. The help is out there if you or your child are willing to learn.The printer came double boxed. amazingly, even the outer Amazon box was in great condition. The factory box was even better and with all of the foam support within, the printer arrived totally unscathed. Unboxing is easy, excepting for removing the black foam that supports everything on the inside of the case and removing the zip ties that hold the printhead securely in place. Remove those carefully and make sure you only cut the zip ties. I cut them in several places, just to make them easier to remove. Once that is done, attach the Bowden tube to the coupler and the printhead, attach the spool holder to the side, plug in the power, and you are ready to turn the machine on. The manual does a decent job of walking you through getting everything ready to print and the included MicroSD card has some files that are already sliced and ready to print. The auto bed leveling is a great addition for this printer. on many of the other inexpensive printers, the constant adjusting of the bed is really a pain in the rear! This feature has become a “Standard” requirement for all printers in this day and age.To begin with, I printed the Benchy, that is included on the SD card, using BL standard Blue PLA. For not being tuned specifically for the printer, it printed very well. The stringing in the picture can be tuned out, and that would make the print even better. For a second print, I wanted to get the spool off the table, where it was just rolling back and forth during printing, and onto the side of the printer. I down loaded the file from the Geeetech website but I also found a design online that would be a quicker print, as it is smaller, and uses the stock filament holder. I sliced the file with a .20 layer height and sent it off to print. an hour and a half later, I was able to get the spool off the table and onto the side of the machine. Much better!There are other files included on the SD card but I wanted to try prints that were not Pre-Sliced to get a better idea of what the printer could do. Included on the MicroSD card is a slicer that is recommended. Since I have Prusa Slicer already installed on my PC, I looked to see if there was a printer profile for the Mini.(I use this slicer with my other Geeetech printer), and what do you know, there is a profile there. Once I had loaded up the profile, it had a “Generic” PLA profile available. I picked an axolotl keychain, imported the file, choose a .16 layer height with tree supports, sliced the file, saved it to the SD card, put the card back into the mini, changed the filament to a nice “rainbow” matte PLA filament, and sent the file off to the printer. The supports looked great but when I tried to remove them, I ran into my first problem. When removing the first support, the bottom layer under the head pulled off with the supports. The nozzle temperature of the generic profile was too low for the matte PLA and the layer adhesion suffered. I changed the temp in the slicer up ten degrees, resliced the model and printed it again, this time with zero supports. This time the print came out great. Once the plate cooled, the piece just popped right off the plate. Testing the layers showed that the increase in temperature was perfect. I then tried the cat keychain with the same settings and it also came out great.As a wrap-up for my initial use of the printer, This printer is a solidly built little printer that can easily fit on the same desk as a laptop, keyboard, and mouse. It isn’t nearly as noisy as several of my other printers but once the fan is running, it is not silent. Printing the adapter for the full size spools is a recommended first upgrade to the printer. Is this a mini-replacement that beats the newest flagship $2500 printer on the market, no, but it also isn’t $2500! This is a low cost, easy to learn from printer for someone that isn’t afraid to learn something new. It is a great introduction to the entire 3d printing process and fun way to learn alongside your kids or students.I have really enjoyed this cute little printer so far and I plan to use it with all of the neighborhood kids who have found out that I know how to 3D print the gadgets and gizmos that they like. I will use the printer to teach them how to print their own items, so I don’t have to use production machines to do so, and in the long run, you never know which one might catch the 3D printing bug and get their parent to buy them their own printer. That is the best part of teaching young people and part of why I enjoy printing so much.
J M –
My look like a toy, but it is a real 3D printer
What an intriguing product! This printer defies easy classification. Although I am not an expert on 3D printers, I have gained experience with several different models over the years. I began my journey with a popular bed slinger approximately six years ago and quickly fell in love with 3D printing, eventually owning a total of six bed-slingers at one point. As is often the case with technological advancements, I have since transitioned to Core XY printers. This particular printer incorporates elements of both designs, and I will elaborate on that later.3D printing has brought me immense joy by enabling me to bring my imagination to life. Additionally, there are numerous models available for free download online. Friends and family have also benefited from my 3D printing journey. As a grandparent, it is my pleasure to spoil my grandchildren; they have enjoyed everything from printed toys to personalized unicorn light switch covers. Therefore, when I discovered the Geeetech M1 mini printer, I immediately thought of my grandchildren. What better way to introduce them to the world of 3D printing firsthand than with a printer designed specifically for children?I have seen printers in the past that claim to be designed for children, but I have always been skeptical. As anyone with experience in 3D printing knows, inconsistencies in the printing process can lead to significant frustration. This frustration has caused many individuals to abandon the hobby, and I did not want that to happen to my grandchildren. Therefore, I decided to take a leap of faith and purchase the M1 Mini.The M1 Mini arrived exceptionally well-packaged. After unboxing and removing all the packing materials, zip ties, and screws, I powered up the unit. After all, who needs to read the instructions for a simple bed slinger? I loaded the supplied filament, selected a model from the SD card, and hit print. However, it did not print, so I checked the display to determine the issue. I was surprised to see a message indicating that the unit had not been balanced. At that moment, I realized I should have read the instructions. This brings me back to my earlier statement regarding the classification of this printer: this is no toy. The printer underwent automatic calibration to optimize print quality, and this feature alone contributes to more successful prints. I decided to explore the printer further to understand its construction and the features it offers. So, I did what most of us do: I turned to the internet to read articles and watch videos. I will not reiterate information that can easily be found online. The pictures display sample prints I sliced and highlight various points of interest. Here is what I discovered:Pros:1) Easy to use. I tried to think like someone with no printing experience. Aside from bed adhesion issues on one print, it just works.2) The display is user-friendly. Although the menus are straightforward, they may present a challenge for individuals with no prior experience. However, after a brief period, beginners will find it easy to navigate.3) Build quality. The printer exhibits excellent build quality, designed to maintain simplicity.4) By utilizing UltiMaker Cura slicing software and your own USB-B cable, you can print directly from a computer. I dislike printing from an SD card. While this may not be a significant concern for some, it is for me. The profiles can be found on the company’s website.5) The printer produces excellent results with PLA and PLA+. Although I have not tested it with TPU, the documentation indicates that it is compatible.6) You can use a standard 1 kg spool of filament.7) The removable build plate makes it easy to remove prints.Cons:1) While the build quality seems satisfactory, the extensive use of plastic raises concerns regarding its long-term durability.2) Adult supervision is required, as there is no guard in place to prevent individuals from placing their hands in the printer during operation. The nozzle can reach temperatures of up to 230°C.3) There are Orca slicer profiles available on the website; however, the Orca software cannot send a file directly to the printer using a USB-B cable. Orca is my favorite slicer.4) Space is required behind the printer. Please refer to the included picture. While it may not seem significant, it is important to keep this in mind.Yes, I acknowledge that the criticisms may seem nitpicky, but no printer is perfect. That said, this is a fully functional 3D printer. While it may resemble a toy, its features and print quality are impressive and hard to overlook. Will it print as well and possess all the features of a printer that costs two to three times as much? The answer is no. The build plate is relatively small, but if I had included this as one of the drawbacks, I believe it would miss the point of the printer. However, does the M1 Mini open the door to 3D printing for children? Without a doubt, the answer is yes. Will the kids be satisfied with what they can print? I believe they will be. The only real question I have is regarding its long-term durability, but hopefully, it is sufficient to teach the necessary skills to transition to a much larger all-metal printer.So, the real question is: Do I believe the printer meets or exceeds its intended purpose for the target audience? I can say unequivocally, yes—and even more so.
I-man33 –
Une petite imprimante venu remplacer la grosse et ancienne ender3V2, afin d’imprimer mes petites pièces de drone.Au déballage, on dirait un petit jouet. C’est tout le contraire. Les 1eree impressions sont qualitatives, mais perfectible (comme sur toute imprimante). Réglage du bed facile avec l’auto levelling.
Vincenzo –
Sono un appassionato di stampa 3D, possedevo gia una A20M sempre della Geeetech, con la quale ho dovuto impiegare un po’ di tempo per imparare nozioni, dettagli e tutto ciò che può servire per fare delle buone stampe. Non avendo molto tempo a disposizione non sono mai riuscito ad avere stampe spettacolari, ma mi accntentavo delle mie riuscite. Poi ho visto he è stata lanciata questo modello, e ho deciso di provarlo. Immaginavo che fosse una entry level per chi si vuole avvicinare a questo mondo, ma non credevo che fosse ancora più facile del previsto. Parto col dire che arriva perfettamente imballata, quindi non c’è rischio di trovare brutte sorprese, tutto bene bloccato con spugna e fascette. Le istruzioni sono in inglese ma di facile comprensione. Eventualmente sul loro sito poter scaricarlo e farlo tradurre su un sito. È praticamente plug and play, la accendete fate fare un livellamento del piatto automatico e siete pronti a stampare. Con il filamento dato in confezione sono riuscito a stampare un piccolo bulbasaur e una tazzina per piantine simpatica. È estremamente veloce e precisa, le due stampe sono state fatte con layer di 0.02mm giusto per stampare e provarla, e la finitura superficiale non è per niente male, anzi, se si lavora su 0.01 penso che venga quasi perfetta la stampa. In confezione trovate tutti gli accessori occorrenti per un minimo di manutenzione, e anche una scheda SD dove troverete dei file pronti da stampare, il software sul quale poter scaricare o realizzare nuovi progetti, consiglio fortemente di usarlo perché riconosce già la stampante, quindi credo abbia già molti parametri ben settati. Vi lascio qualche foto e video, ma se volete una stampante senza troppi sbatti, dove volete realizzare oggetti non troppo grandi, può benissimo fare al caso vostro, soprattutto per il prezzo direi accessibilissimo per questo tipo di articoli. Contentissimo del ,io acquisto 😁
Luis R. –
es una impresora 3D ideal para principiantes que quieren empezar en el mundo de la impresión 3D sin complicaciones. Su diseño compacto y colorido la hace perfecta para cualquier escritorio, y lo mejor es que viene prácticamente lista para usar.Una de las cosas que más me gusta es la placa de la cama de impresión que ya viene incluida no hay q andarla buscando por otros lados: al ser flexible y extraíble, puedes retirar las piezas nada más terminar la impresión sin necesidad de herramientas ni riesgo de dañar el modelo. ¡Simplemente doblas un poco la base y la pieza sale sola! Eso, para alguien que empieza, es un detalle que ahorra muchos dolores de cabeza.También me ha gustado que cuenta con nivelación automática y una extrusora de accionamiento directo, lo que garantiza impresiones más precisas y evita estar ajustando constantemente. La velocidad de impresión es bastante buena (hasta 250 mm/s) para su tamaño, y su volumen de impresión de 100 x 110 x 100 mm es más que suficiente para figuras, piezas pequeñas, accesorios y juguetes.En resumen:✅ Perfecta para principiantes.✅ Muy fácil de usar.✅ La cama extraíble es un puntazo para sacar piezas al instante.✅ Compacta y silenciosa.Si buscas tu primera impresora 3D, esta es una gran opción para empezar con buen pie.
Jens Gabrikowski –
Der Geeetech M1 Mini kam in einer schlichten, aber praktischen Verpackung an – kein überflüssiger Schnickschnack, aber dafür punktet das Gerät selbst mit einem überraschend ansprechenden und modernen Design. Der Aufbau war erfreulich einfach und schnell erledigt, dank der zwar englischen, aber gut verständlichen Anleitung. Schon nach wenigen Minuten war alles einsatzbereit.Positiv: Eine kleine Filamentprobe sowie einige Beispielprojekte auf der beiliegenden microSD-Karte ermöglichen es, innerhalb von fünf Minuten mit dem Drucken loszulegen – ideal für Einsteiger. Die Bedienung erfolgt zwar nicht über ein Touchdisplay, aber das intuitive Drehrad mit Taster funktioniert hervorragend. Wer schon einmal mit Marlin Firmware gearbeitet hat oder die Uhr an seiner Mikrowelle stellen kann, wird sich direkt zurechtfinden.Die Menüführung ist logisch aufgebaut, und auch die Sprache lässt sich schnell auf Deutsch umstellen. Homing und Bettnivellierung lassen sich bequem über das kleine TFT-Display starten. Endschalter sind auf allen Achsen vorhanden.. Besonders erfreulich: Das Autoleveling erfolgt direkt über die Düsenspitze welche 4×4 Punkte auf dem Druckbett erfasst, was in der Praxis für sehr gute Ergebnisse sorgt.Auch an einen Filamentsensor wurde gedacht, der zuverlässig erkennt, wenn das Filament zu Ende ist oder reißt – ein echter Pluspunkt in dieser Preisklasse. Die auf der SD-Karte enthaltene Software OrcaSlicer enthält bereits ein fertiges Profil für den M1 Mini und lässt sich bequem starten oder auf einen Windows-PC übertragen.Alle beweglichen Teile sind gut gegen versehentliches Berühren geschützt – ein wichtiger Sicherheitsaspekt, gerade wenn Kinder mit dem Gerät arbeiten. Das macht den Drucker zu einer ausgezeichneten Wahl fürs Kinderzimmer, das Büro oder sogar für den mobilen Einsatz im Wohnmobil. Das Druckbett ist zwar kompakt, verbraucht dafür aber auch weniger Energie. Es erreichte in meiner Messung an der Oberfläche bis zu ~55°C, was für PLA und TPU vollkommen ausreichend ist. Auch traue ich diesem Thermometer durchaus auch eine Drift von einigen Grad zu. Die PEI-Druckplatte mit strukturierter und glatter Seite erlaubt zudem Experimente mit verschiedenen Materialien und Oberflächentexturen.Mein erster Testdruck, ein Calibration Cube, zeigte bereits recht gute Ergebnisse. Die Maße waren weitestgehend korrekt, nur bei der Z-Achse bzw. dem ersten Layer werde ich in den Einstellungen noch etwas nachjustieren. Besonders praktisch: Einen passenden Halter für 1-kg-Spulen konnte ich mir nachträglich drucken – zu finden bei cults3d.com unter dem Namen „GEEETECH M1 MINI 1KG SPOOL HOLDER ADAPTER FOR ORIGINAL SPOOL ROD“. Alternativ kann man natürlich auch einen externen Spulenhalter für ein paar Euro dazukaufen.Fazit:Für einen wirklich günstigen Preis bekommt man mit dem Geeetech M1 Mini einen ausgereiften, kompakten 3D-Drucker. Die Bedienung ist einfach, der Funktionsumfang aber erstaunlich groß – mit vielen Möglichkeiten zur individuellen Anpassung. Ob als Einstieg in die Welt des 3D-Drucks oder als kompakter Zweitdrucker: Der M1 Mini macht richtig Spaß. Meine Kinder werden ihn jedenfalls lieben.
Simone –
Sono possessore di altre stampanti di alto livello ma avevo bisogno di una stampantina per far imparare le mie piccole bambine.Ho deciso di prendere questa M1 per fargli imparare il mondo della stampa 3D.Pensavo fosse un giocattolo ma mi sono dovuto ricredere. Stampante facile, veloce e precisa.Ha tutte le funzioni delle stampanti di fascia più alta. Autolivellamento , autocalibrazione e auto pulizia.Basta caricare il filo e dargli impasto il gcode e fa tutto lei.Si configura facilmente con orca slicer, PRUSA slicer e cura grazie ai preset scaricabili dal loro sito.Che dire consigliata